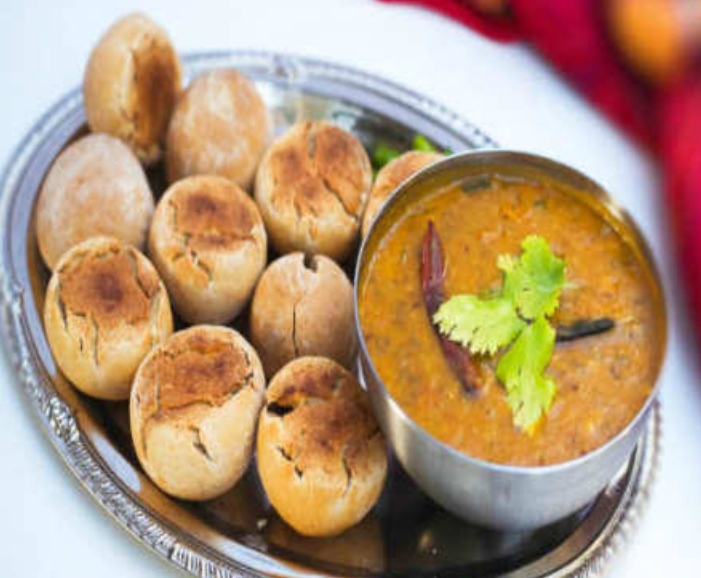
Dal Baati Recipe

Ingredients Dal Baati Recipe
- 2 cups whole wheat flour
- 1/2 cup semolina (sooji)
- 1/2 cup ghee (clarified butter)
- 1/2 teaspoon carom seeds (ajwain)
- 1/2 teaspoon baking powder
- Salt to taste
- Water (as needed)
For Dal:
- 1/2 cup split yellow moong dal
- 1/2 cup chana dal (Bengal gram)
- 1/4 cup toor dal (pigeon pea lentils)
- 1/4 cup urad dal (split black gram)
- 1 onion, finely chopped
- 2 tomatoes, finely chopped
- 2 green chilies, chopped
- 1 teaspoon ginger-garlic paste
- 1/2 teaspoon turmeric powder
- 1 teaspoon red chili powder
- 1 teaspoon cumin seeds
- 1/2 teaspoon mustard seeds
- 1/2 teaspoon garam masala
- 2 tablespoons ghee
- Salt to taste
- Fresh coriander leaves for garnish
How To Make Dal Baati Recipe
-
- In a large bowl, mix wheat flour, semolina, carom seeds, baking powder, and salt.
- Add melted ghee and mix until the mixture is crumbly.
- Gradually add water and knead into a stiff dough.
- Divide the dough into equal portions and shape into round balls. Flatten slightly.
- Preheat oven to 180°C (350°F). Place baatis on a baking tray and bake for 25–30 minutes, turning occasionally, until golden brown.
Traditional method: Baatis can also be cooked over charcoal or in a tandoor. - Dip hot baatis in melted ghee before serving.
For Dal:
- Wash and soak all dals together for 30 minutes.
- Pressure cook dals with turmeric and salt for 3–4 whistles, until soft.
- Heat ghee in a pan. Add cumin and mustard seeds. Let them splutter.
- Add onions and sauté until golden.
- Add ginger-garlic paste and green chilies. Sauté for a minute.
- Add tomatoes, red chili powder, and cook until tomatoes are soft.
- Add cooked dal, garam masala, and adjust salt. Simmer for 5–10 minutes.
- Garnish with fresh coriander.
- Place hot baatis on a plate, break them open, and pour ghee over them.
Serve with hot dal, and ghee on the side.